
Building my first electric longboard under $200 USD
Published: November 24, 2019
I have been fascinated by skateboards ever since I got my very first Tony Hawk Pro Skater video game when I was 9. I wasn't huge on learning tricks or going to a skatepark when I got my first skateboard. So naturally, I was turned off immediately when I couldn't keep up with my friends riding bicycles. Hence, biking became the closest thing I had to the last-mile vehicle. Fast forward a little over a decade later, that all changed when I saw my first electric skateboard. Specifically, ever since I saw Casey Neistat ride one for the very first time on his vlog 📹 Overpowered Motorized Skateboard by CaseyNeistat.
Embedded content: https://youtu.be/tSCoVPoCt1U?t=413
Boosted Boards and many other similar boards on the market seemed like great toys to satisfy my inner child. I would fantasize about riding one to work, lunch spots and even my barber, but their large price tag made them seem like just expensive toys. Hence, I came to the obvious conclusion any engineer would - why can't I just build this myself?! 🛠
Background
If you are reading this, you are probably somewhat interested in building an electric longboard, so I am NOT going to tell you DON'T TRY THIS AT HOME... however,
Before you begin, I want to point out that longboarding is a dangerous sport. This coupled with powerful electric motors can lead to high speeds, that could result in serious injury or death. Always wear a helmet when using your longboard and stay within your comfortable speed range, especially when riding on the road. Stay safe out there! 🤗
Although I had been involved with high school robotics teams and code for a living, I wanted to keep the build process as simple as possible. Electrical engineering isn't my biggest strength, so I wasn't going to be assembling my battery pack... especially after witnessing this. 😳
Embedded content: https://youtu.be/gvNgJeXW5nE?t=46
For my first build, I wanted to use a Li-ion battery (over a Lipo battery) with a fail-safe BMS (battery management system) and a pre-programmed speed controller over a VESC. I was open to renting out shop space if needed but was pretty satisfied with access to limited toolsets in our landlord's garage, including a hack saw, a table grinder, soldering iron, glue gun, electric hand drill, and a handheld grinder.
Research
Before I started, I knew I wanted the performance and speed of a Boosted Mini S with a single motor drive. So here's the trick that helped me bring the cost down of the DIY electric skateboard:
- A very cheap on-sale longboard on Amazon 🤑
- All parts were bought from China on AliExpress and eBay 👌
There are tons of online stores in North America that sold these, including MBoards and Enertion. However, being located in Canada, these parts ended up getting very expensive due to shipping and customs. Although prices were great and affordable on AliExpress, I knew I would have to wait 2+ months in some cases and also risked having the parts never show up. This happened once with the ESC, but AliExpress was quick to refund and resolve the issue. However, this left me having to reorder a new part 2 months after I had started the process. Nevertheless, I was really satisfied with all the parts that showed up and would use AliExpress again.
While I was researching parts, I came across a very simple yet useful Electric skateboard calculator called ESK8 Calc. This helped me better understand how to get my board to my desired speed and performance. If you are interested in getting a better understanding of your board's range and performance, check out this ESK8 Calculator. Although buying a hub motor would have been easy to assemble, a direct belt drive motor is the choice I ended up going with for more torque with a single motor drive and better serviceability of the drive train. After playing around with specs for the parts I shortlisted, I came up with the perfect configuration for my board, with a top speed of just under 30km/h.

Essential parts list
I started by finding a cheap longboard on Amazon. Since this arrived in a couple of days, I had two months to ride it to work and get used to riding one. It had been over a decade since I rode a skateboard, so the delayed AliExpress shipping times worked in my favor. I realized quickly that I would need to replace the bearings so the wheels were a lot smoother and it was able to reach speeds up to 30 km/h.
I was able to easily remove the wheels with a T-tool and saw that the truck's axle was nice and circular, which led me to get an appropriate truck motor mount that would easily slide onto the circular truck axle. Since my wheels were 70mm in diameter, I got the truck mount that came with gears for both the motor and the wheel size, as well as the belt to connect the two gears and bolts to mount these on. I could have invested in wheels that came with holes to mount the gear but decided to start with drilling holes directly into the wheel. I ended up buying an 8mm shaft 270kV motor so that it would fit the motor gear that came with the motor assembly kit. A 270kV motor meant a LOT of RPMs. How many you ask?
270kV * 24V battery = 6,480 MAX RPM for the motor 😱However, what I didn't realize as a result of signing up for a fast motor was that I would have to significantly sacrifice on the torque. This meant slower acceleration (and deceleration) and not as a responsive drive train. A motor around 170kV would have been perfect in both aspects and given me enough power to get going. The 270kV motor did allow me to keep the costs low.
Once I had the hardware figured out, all I needed was an electric speed controller (ESC) and a battery pack. I ended up going with an ESC substitute, which worked for what I needed and a 24V lithium-ion battery with a size of 6Ah. On a single motor drive, this would have given me about 10-12km range. The battery also came with a nice charger, so I wouldn't have to remove batteries to charge them, as in the case of Lipo batteries. I also ended up getting an XT-60 connector to connect my battery to the ESC. 🔌
And that was it! It was all a waiting game after I hit the Order button. All the essential parts mentioned are listed below.
** All listed prices are in Canadian Dollars (CAD)
Longboard
Battery
- 24V 6Ah 6S3P Lithium Ion 18650 Battery with charger - $54.69
- XT60 XT-60 Male Female Bullet Connectors - $3.05
Electric speed controller
- Single motor electric controller ESC Substitute - $61.75
- Two enclosures/Tupperware containers from Dollarama - under $5.00
- Nuts and bolts to mount the enclosures on the board - under $10.00
Motor assembly
- Brushless Outrunner Motor N5065 270KV 1665W - $43.89
- Motor Pulley Mount for 72mm 70mm Wheels - $31.91
The total for all the parts above came to exactly $256.28 CAD, which is about $192.68 USD. 💰 These gave me a good place to start and add on any necessary parts later.
Non-essential parts list
Although these weren't essential for the build, I decided to replace the longboard wheel bearings to make it a smoother ride and also get a T-tool for the longboard to help with replacing wheels and tightening trucks. I ended up getting some Loctite to make sure the screw and bolts on the motor assembly didn't come to lose during a ride. 😬
- Skateboard Bearings - $25.95
- Multi-function Skate T-Tool / wrench - $9.90
- Thread Locker Blue - $8.99
The build 👷♂️
Hence, the fun and the challenges began... 😅
As soon as I got my motor mount assembly kit, the mount did not slide onto the truck shaft because of the smaller diameter of the mount. I had two options - drill a bigger hole in the mount or use a table grinder to grind the paint of the truck to slide it. I ended up going with the latter option as I couldn't find a big enough drill size to drill through the shaft hole for the motor mount.

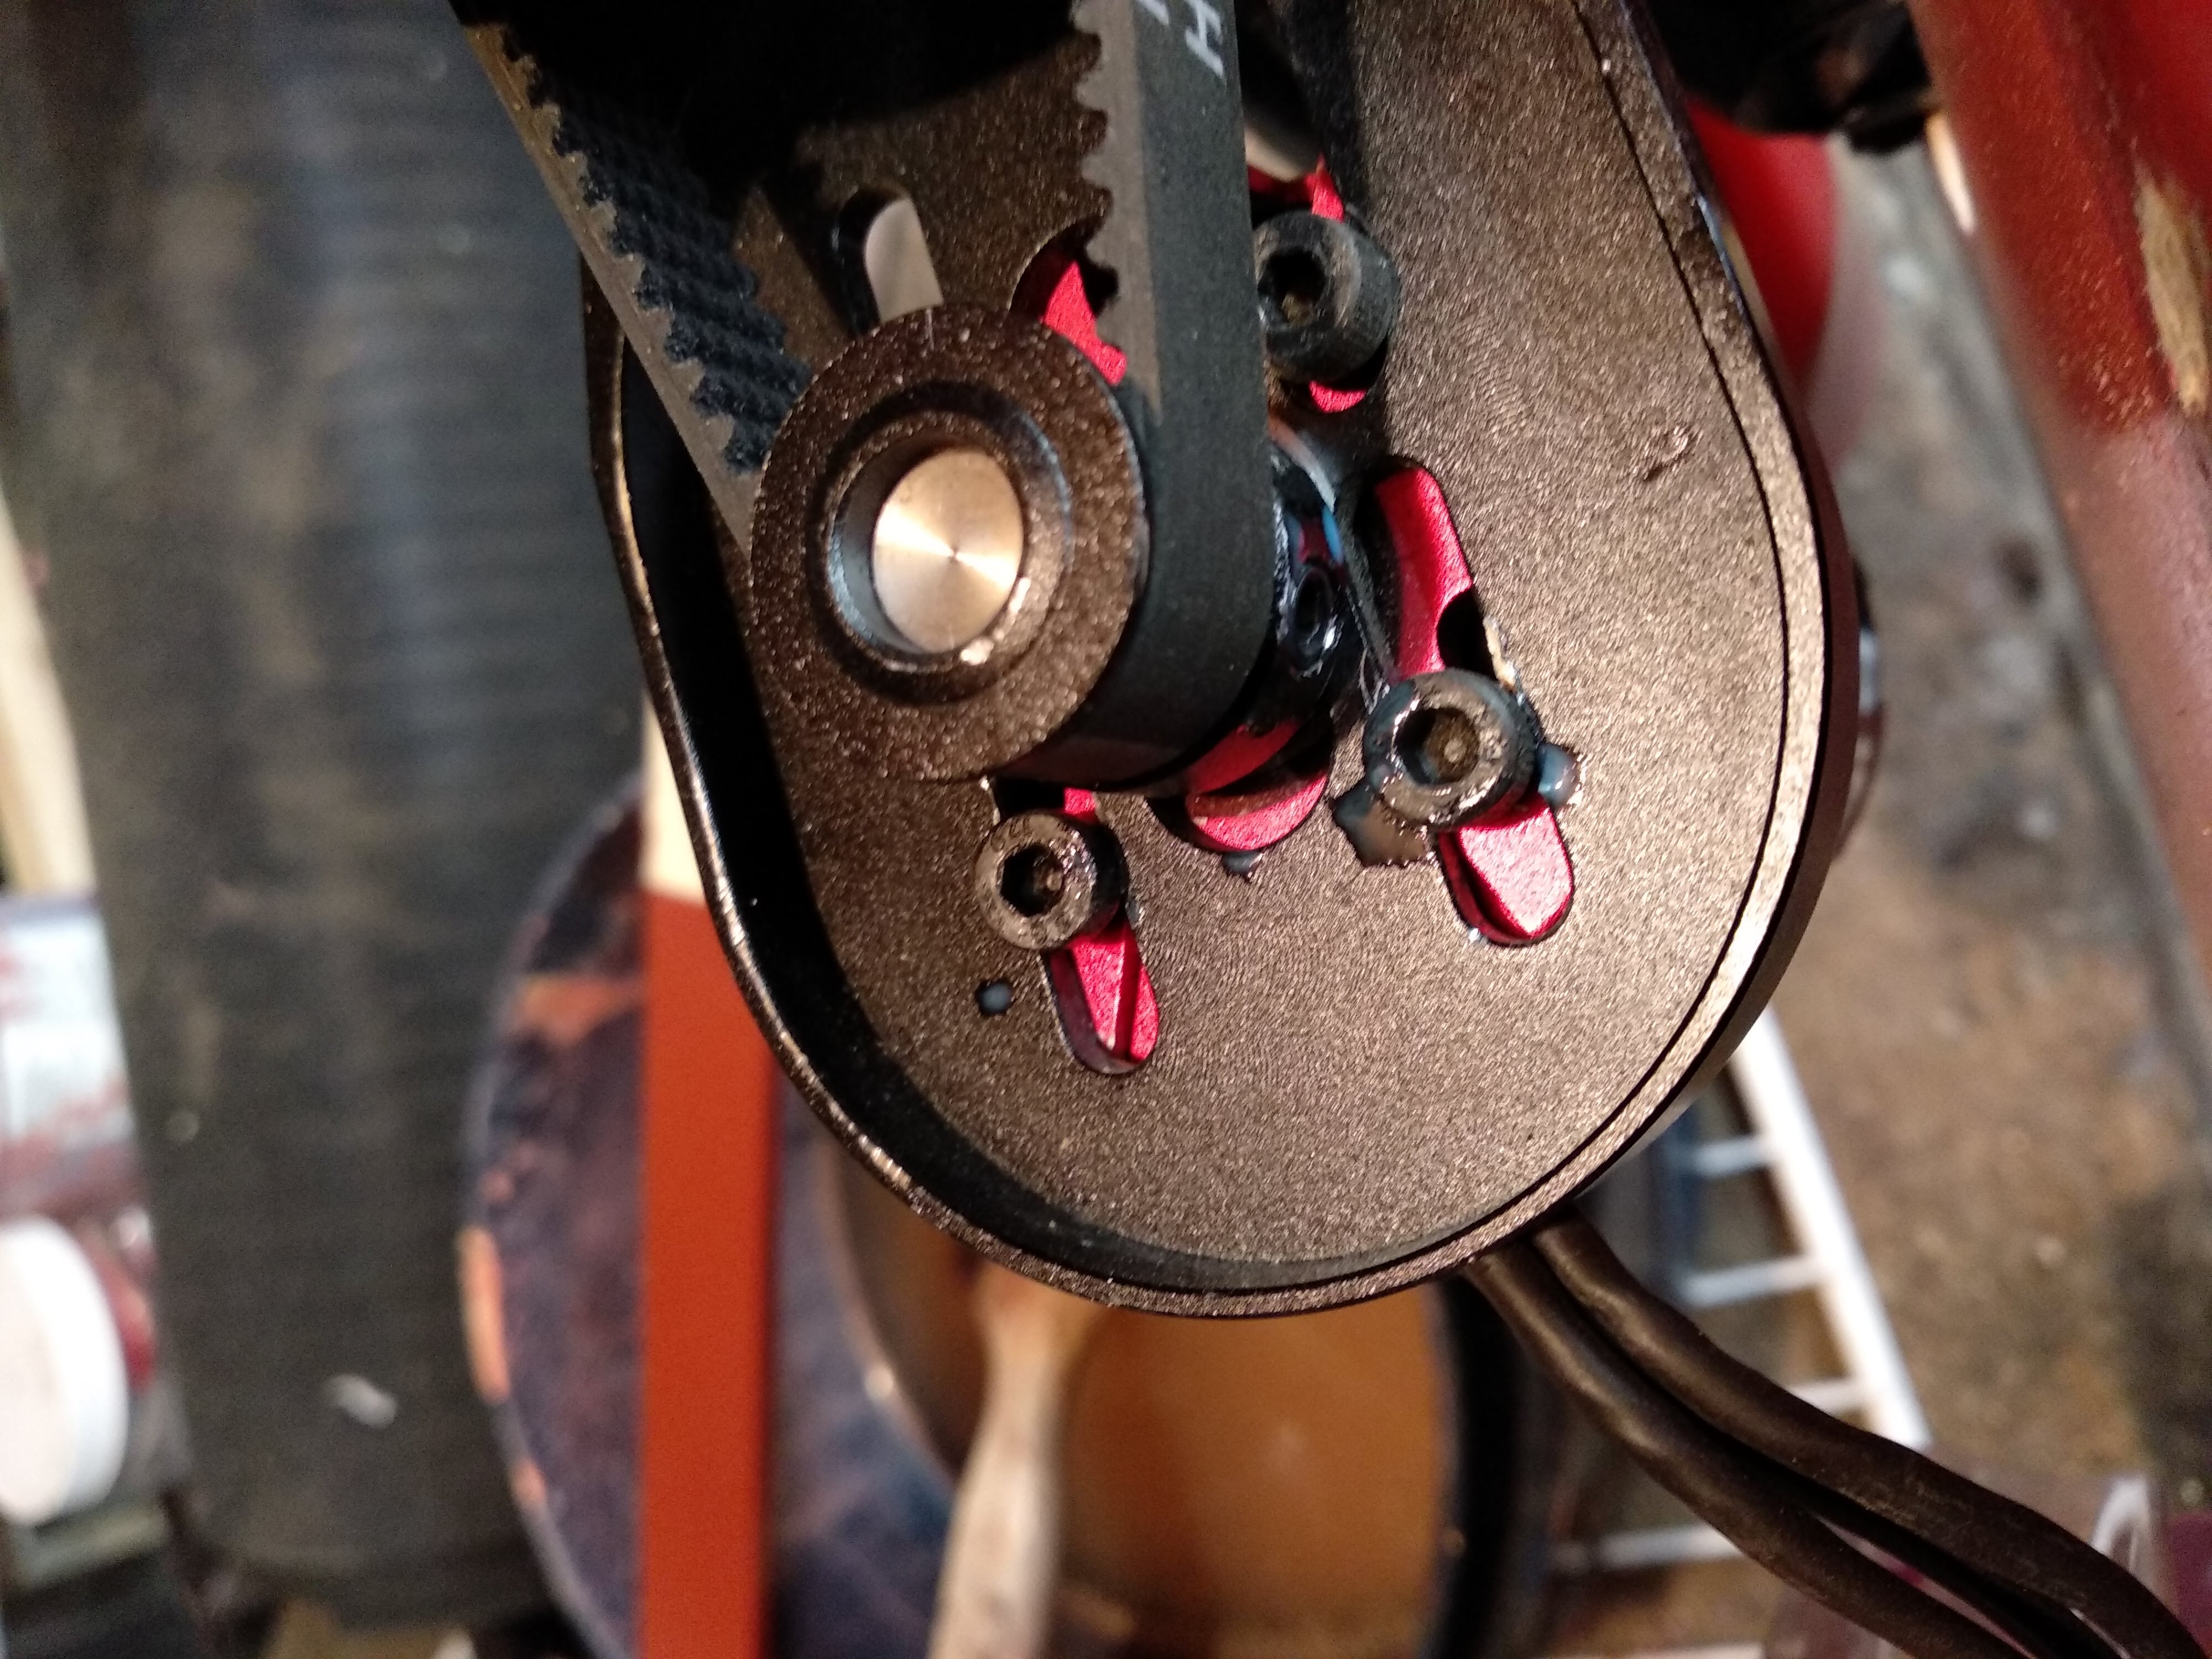
I also soon learned that the motor mount would dislocate under tons of forces from the board hitting it during turns, the forces, and vibrations from the motor and obstacles on the road that would hit the motor mount when I rode over them. In hindsight, a longboard with more height clearance would have been ideal. However, being close to the ground did provide a lot of stability at higher speeds. So I ended up using a Sharpie marker to cover the truck axle and mark the holes on the shaft where the motor mount bolts made contact. This made it easier to drill small indents where the bolts would lock into the shaft. I was able to fasten the motor mount and have a lot more confidence that the mount wasn't going to start moving mid-ride.

The motor shaft did not come with a key slot or a flat side to better secure the gear. Due to the high amount of load on a single motor, this complicated the motor assembly and added to the numerous failure points. During one test drive, the gear ended up screwing onto the shaft by threading it using the bolts and abruptly locking against the motor and immediately stopping the board. 😅 I was able to catch my balance as I wasn't going faster than 10km/h, but this made me go back to the drawing board and fix this issue. I ended up adding small indents where the gear bolts would be secure against the motor shaft.


I fastened the motor to the mount, which was relatively simple. I just had to make sure the belt had enough give and wasn't too tight that it provided strain on the motor shaft. A slight pinch ensured that I was set. 👌
I decided to mount the ESC close to the motor (the bottom of the board) and the battery at the top, the part of the board where I knew my legs weren't going to miss the space. The Tupperware worked perfectly since I had to open it to service the connections frequently. I used some velcro to secure the battery in place in the enclosures.


I ended up using a hand drill to drill fives holes through the wheel, which ended up being the most painful part of the process. The wheel material made it really difficult to drill straight and consistent holes and then screwing the bolts in to match the offset on the threads in the gear. However, I wanted to see how difficult it would be to retrofit this board than buying new parts altogether, which made this an interesting learning experience.


I ended up drilling six corner holes for the enclosures - of which two of them were shared by the battery and ESC enclosure and the other four were on opposite ends of the two enclosures. I also drilled holes in the enclosure for the battery charging port and for the on-off switch on the ESC. These were secured with the same size nuts and bolts. The size of these doesn't matter too much as long as you have access to the same size drill. I didn't use any washers in this assembly, but they would have increased the surface area and strength of the fasteners, as the enclosures were made of plastic.


Wiring the motor to the ESC was relatively simple with the 3-prong connectors. I had to switch any two to change direction. Being a single motor drive, I could also easily use the remote control to change the direction of the motor.
Connecting the battery to the ESC was a different story. Although I had used some soldering iron in some high school projects, it seemed almost impossible to effectively melt the solder. After enough finessing, I had the battery secured to the XT-60 connector. I just had to make sure the red went to red and the black went to black by connecting the XT-60 connector to the ESC to check the sides and then disconnecting before soldering.

So one piece at a time, the entire board came together and was ready for a test drive.
The test drive 🛹
I found a large parking lot close to home where I was able to take the board for some practice runs. One thing I realized was that initially pushing the board automatically turned on the ESC without me hitting the power button, which made it convenient. How did it go, you ask? Pretty well, in my opinion. 😉
Embedded content: https://twitter.com/BasilAKhan/status/1136112437999079424
Acceleration and deceleration were slow because of the low torque by the motor but it was good for a new rider like me. It gave me enough time to reach speeds I was comfortable with and not have it abruptly stop during braking. I soon got comfortable with taking it on the road and it held up pretty well on the rough roads and asphalt rides!
Embedded content: https://twitter.com/BasilAKhan/status/1137787925805096966
What I didn't end up catching on camera there ☝️ was that the power to my motor somehow stopped at the end of that road and I had to jump and bail off the board since I was going slightly downhill. Upon further investigation, I realized the 3-prong motor connectors came loose during rides because of the vibrations and would lose connection abruptly. I knew I would have to remove these from time to time to service, so I didn't want to solder these in place. However, a strong set of alligator clips did the trick and made me more confident with going downhill on the board. 😄

After a couple of weeks of test riding it around town, I was able to run errands and go places with it. Soon, I started tracking my rides on Strava and as I got more comfortable with the board, I was able to get up to my desired max speed of around 30 km/h on the board.

Embedded content: https://twitter.com/BasilAKhan/status/1149495816769249282
Learnings and next steps
The great thing about building the first version of anything is that there's always tons of room for improvement. Here are a few things I would have done differently:
- A motor with more torque, something around 170kV would have done the trick
- A better longboard that was more stable at higher speeds
- A new set of longboard wheels with holes to mount the gear, instead of drilling through the wheel
- A more secure motor mount and a board with a more vertical clearance
If you found this article helpful or have any questions around building your very own first longboard, hit me up at @BasilAKhan on twitter.
Embedded content: https://share.vidyard.com/watch/rVhHvwcihA2ic9VLveAWuK?